The Camera Bubble: Compositing Two Video Sources in Real Time
The Camera Bubble: Compositing Two Video Sources in Real Time
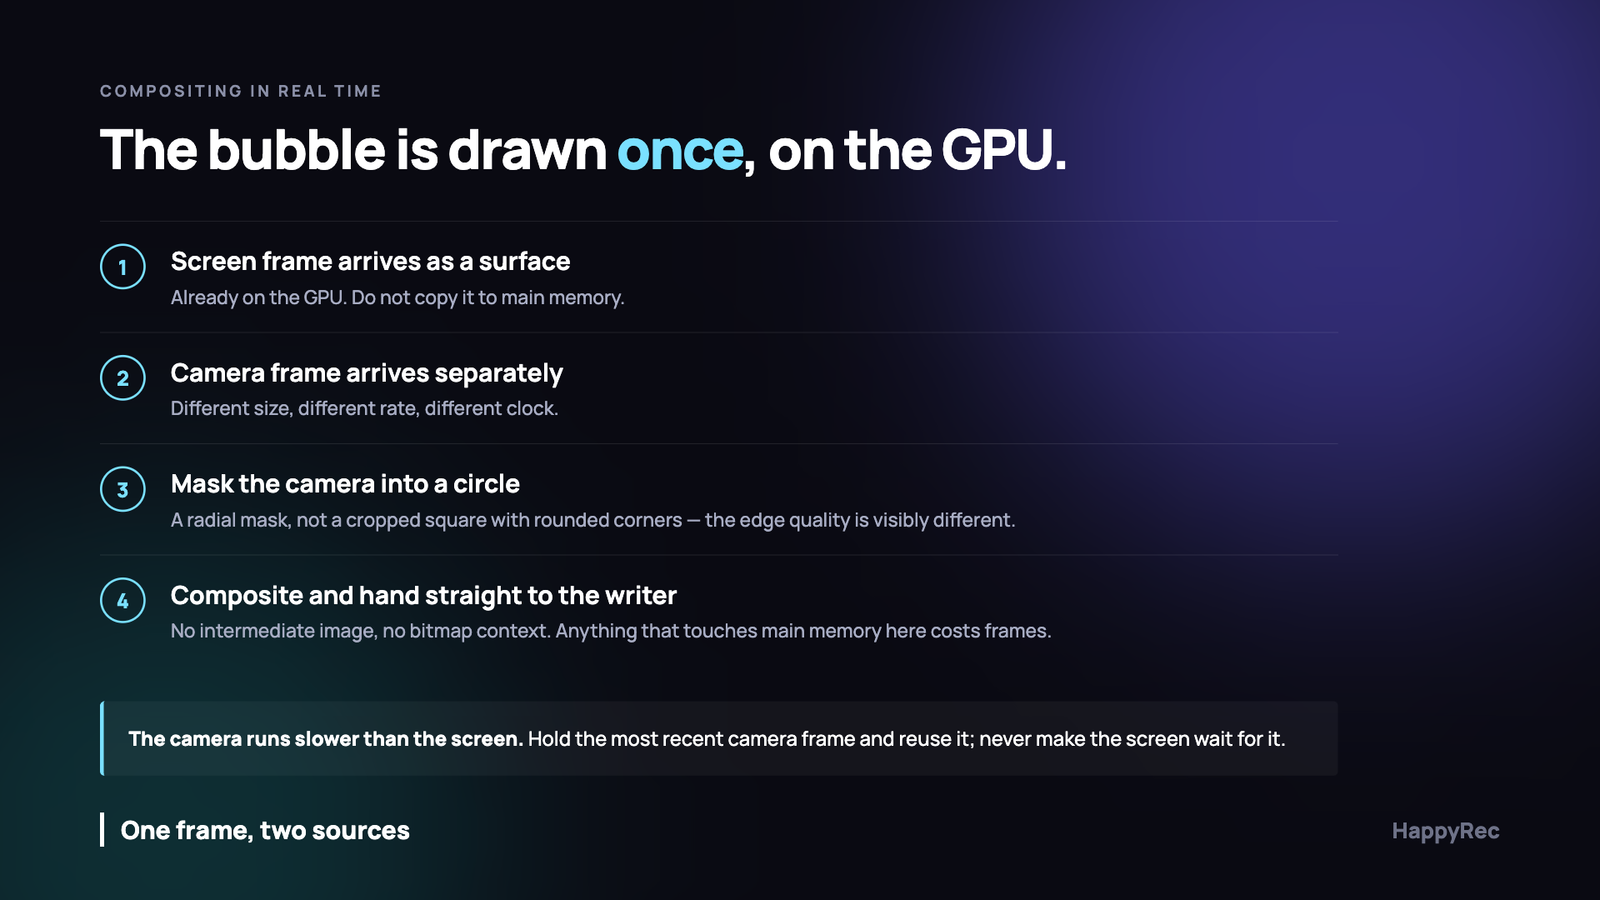
A round camera bubble in the corner of a screen recording is one of those features that looks like an afternoon of work. Draw the camera in a circle, put it on top of the screen frame, write the result. In a prototype that is exactly what it is.
In a shipping recorder it is where the frame rate goes, because the two things you are combining have nothing in common — different sizes, different rates, different clocks, and one of them is already on the GPU while the other is arriving from a device that occasionally stops for a moment to think.
Two sources that agree about nothing
A screen frame arrives as a surface that already lives on the GPU. It is large, it arrives when the screen changes rather than on a schedule, and it should never be copied into main memory for any reason.
A camera frame arrives from a capture session at whatever rate the device manages — often thirty per second, frequently less in poor light, because most cameras extend exposure rather than drop brightness. It is small, it is on a different clock, and it keeps arriving whether or not the screen has changed.
The composite has to produce one frame at the output rate from these two, and the ordering rule that makes everything else simple is: the screen drives, the camera follows.
Never make the screen wait
The tempting design is to wait for a matching camera frame before compositing, so that both halves of the output are from the same instant. It is more correct and it is unusable, because the camera is slower and every screen frame now waits for it.
What works is to keep the most recent camera frame in a single slot that the capture callback overwrites. When a screen frame arrives, composite it with whatever is in that slot right now. The camera image may be up to a frame or two old; nobody has ever noticed, because a face does not move much in thirty milliseconds. What people do notice instantly is a screen recording running at eighteen frames a second.
Masking a circle properly
A circular crop looks like a solved problem until you compare two implementations side by side at full resolution.
Cropping to a square and applying a large corner radius produces a shape that is very nearly a circle and has a subtly wrong edge — the curvature is not constant, and against a busy screen background the eye picks it up as a slightly polygonal blob. A radial mask produces a true circle with a soft, correctly antialiased edge.
The difference costs nothing at run time, because both are a single GPU operation, and it is the kind of detail that separates something that looks made from something that looks finished.
Two related choices worth making deliberately. Fill rather than fit — the camera is almost always wider than it is tall, and fitting it inside a circle leaves bars. And crop from the centre-top rather than the centre, because a person’s face sits in the upper half of a webcam frame and a true centre crop cuts the top of their head.
Face tracking, and why it must be slow
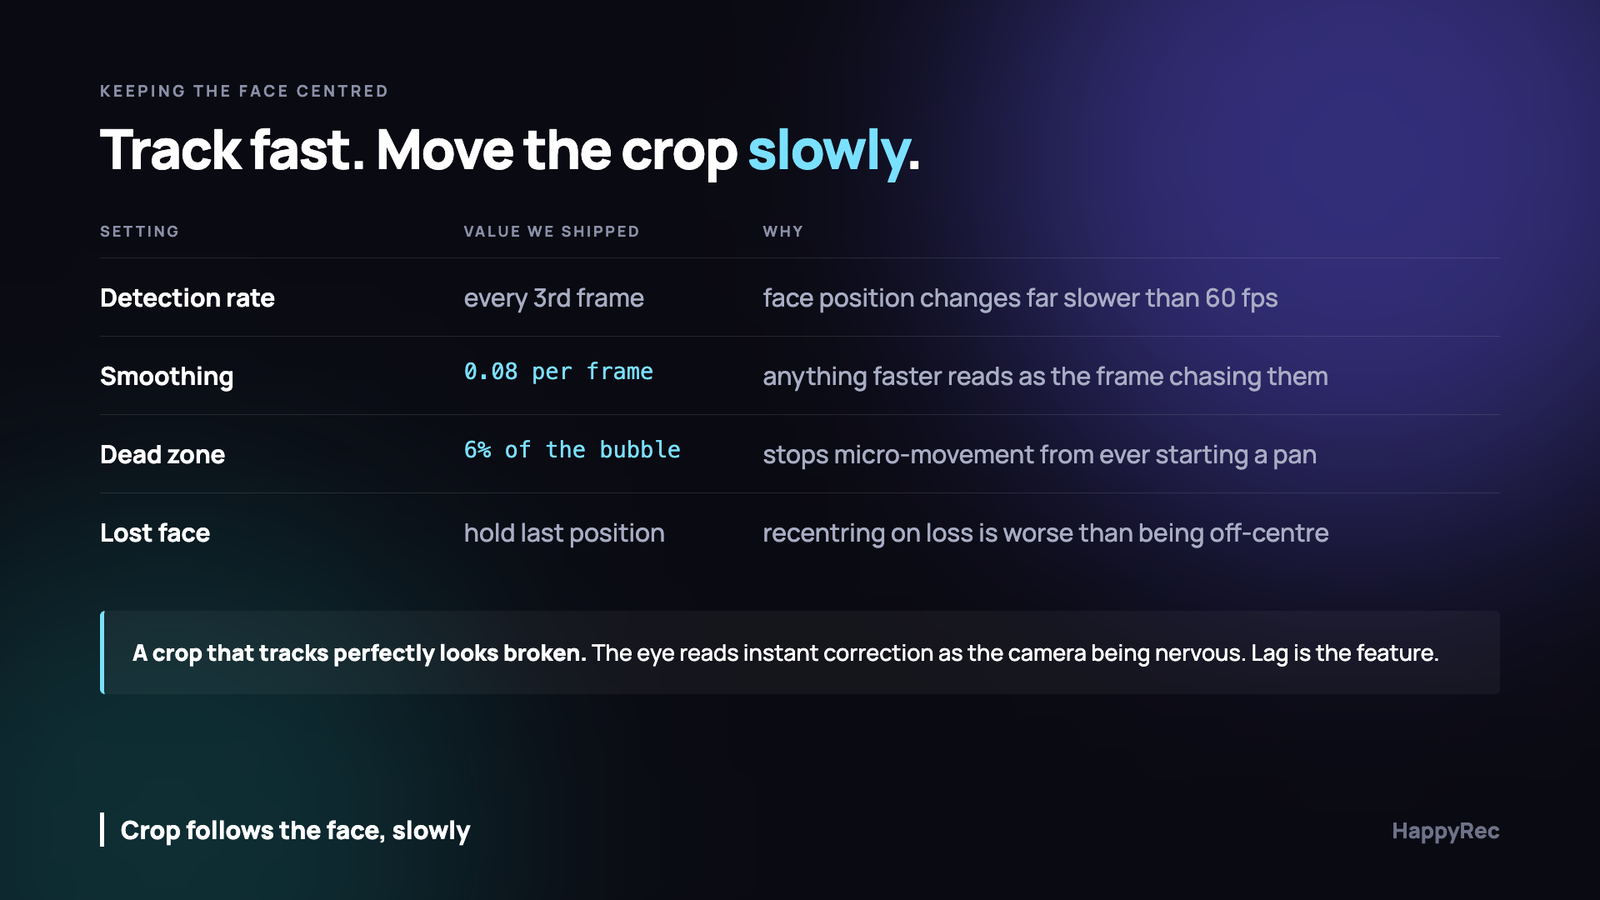
Once the camera is cropped into a circle, a person who leans out of frame disappears. The obvious fix is to find the face and keep it centred, and the obvious implementation of that fix looks broken.
If the crop follows the detected face position exactly, every small movement — a nod, a shift in the chair, a hand passing across the frame — moves the picture. The result is a camera that appears to be constantly correcting itself, and it is far more distracting than being slightly off-centre would have been.
Four numbers make it feel right, and all four are about doing less:
- Detect on a fraction of frames. A face moves slowly. Running detection on every third frame is indistinguishable from every frame and costs a third as much.
- Smooth heavily. Move the crop a small fraction of the way towards the target each frame. The lag is the feature.
- Use a dead zone. Ignore movement inside a small region around the current centre entirely, so ordinary micro-movement never starts a pan at all.
- Hold on loss. When detection fails — someone turns to look at a second screen — stay where you are. Recentring on loss is the single most jarring thing this feature can do.
A crop that tracks perfectly looks like a mistake. Users describe it as “the camera keeps moving”, which is exactly what it is doing, correctly, and exactly what they do not want.
Detection has a cost you can move
Face detection is not free, and it does not belong on the path that produces frames. Run it on its own queue, on a downscaled copy, and let it publish a position that the compositor reads. If detection is slow for a few frames, the compositor keeps using the last position and nothing stutters.
The failure mode to avoid is detection running inline before each composite. It works in a prototype with one small camera and collapses the moment the machine is also encoding a Retina screen.
Where the bubble sits
The position of the overlay seems like a preference and turns out to be a functional decision, because the bubble covers part of what is being recorded.
Bottom-left is the default that causes the fewest complaints, because the bottom-right corner of most screens contains something people want visible, and the top corners contain system chrome. But the honest answer is that it depends entirely on what is being recorded, which is why it has to be movable and why the movement has to be possible during a recording rather than only before.
One detail worth building: when the bubble is moved, move it in the composited output too, not just in the preview. It sounds obvious and it is very easy to end up with a preview that reflects the new position and a file that does not, because the preview reads a live value and the compositor captured one at start.
Camera permission is its own conversation
Screen recording and camera access are separate permissions with separate prompts, and asking for both at once is how you lose people.
A user who wanted to record their screen and is suddenly asked for camera access has a reasonable question, and if your interface does not answer it before the prompt appears, the answer they invent is worse than the truth. We ask for the camera only when the bubble is switched on, never at launch and never alongside the screen prompt.
The practical consequence is that the app must work completely with screen permission granted and camera refused. Not degrade — work. The bubble control shows why it is unavailable and everything else behaves normally. An application that becomes unusable because an optional permission was declined is an application people delete.
The camera in use by something else
On a Mac the camera can be held by another application, and the failure is not an error you get at start — it is a session that starts and delivers nothing. The green camera light is on, your preview is black, and no API call has failed.
Treat a camera session that has produced no frames for a couple of seconds after starting as a failure, say so plainly, and name the likely cause. “No camera frames — another app may be using it” resolves the situation in five seconds. A black circle resolves nothing.
What the preview must and must not show
The preview of the camera is not the same picture as the one going into the file, and the difference matters in one specific way.
The preview should be mirrored, because people expect to see themselves as they would in a mirror and an unmirrored preview makes everybody feel that something is subtly wrong. The recording must not be mirrored, because text behind the person would be backwards and because everyone else sees them the correct way round.
This is a one-line difference that is very easy to apply in the wrong place. Apply it in the preview layer only, never in the compositor, and write a test that checks the output frame — because the mistake is invisible until somebody records a whiteboard.
Encoding two sources into one file
Once composited, the output is a single video track and the encoding decisions are ordinary. The two that matter for this feature specifically are resolution and bitrate, and both are decided by the screen rather than by the camera.
Recording a Retina display at full resolution produces an enormous file for content that is mostly static text. Halving the output resolution makes the file a quarter of the size and, for a screen recording that will be watched in a browser window, is frequently indistinguishable. We default to that and let the user choose full resolution deliberately.
Bitrate should be generous rather than clever. Screen content is unusual — long periods of no change punctuated by a whole screen changing at once — and an aggressive bitrate target produces a recording that looks perfect while somebody reads and turns to mush the moment they scroll.
Test screen encoding with scrolling, not with a still page. Every quality problem in a screen recorder appears during scrolling and nowhere else.
When the machine cannot keep up
On an older machine, capturing a large display, compositing a camera and encoding in real time will occasionally exceed the time available for a frame. What happens next is a design decision you should make rather than discover.
Dropping a frame is correct. Falling behind is not. If the compositor is late, the right response is to skip the frame it has not finished and carry on with the next one, so the recording stays in step with the clock and loses a frame nobody will see. The wrong response is to queue the work, because the queue only grows, and by the end the recording is minutes behind and the audio no longer matches.
The way to keep this honest is a bounded queue of exactly one frame. If a new screen frame arrives while the previous is still being composited, replace it. Never accumulate.
Count the drops and log the count at the end of the recording. Not to show the user, but so that a support mail about “jerky video” has a number in the diagnostics rather than a description.
Preview cost, and the tab nobody closed
A camera preview is a live video view and it costs something to run. On its own that is fine. The problem appears when the preview keeps running after the person has moved on — the window is closed, the app is in the background, the bubble has been switched off — and nothing stopped the capture session.
A camera session left running holds the device, keeps the green light on, and prevents every other application from using the camera. Users notice the light long before they notice the battery, and a recorder that keeps the camera light on while doing nothing looks exactly like a recorder that is secretly recording.
Stop the session whenever the preview is not visible and no recording is running. Start it again when it is needed. The start cost is a few hundred milliseconds and it is worth every one of them, because the alternative is a support mail that begins “why is your app watching me”.
Two clocks, one file
Screen frames and camera frames carry timestamps from different clocks, and the composite has to be stamped with one of them.
Use the screen frame’s timestamp, because the screen frame is the one that triggered the composite. Using the camera’s timestamp produces an output whose timeline jitters with camera arrival, which is irregular by nature, and the file ends up with frames that appear slightly out of order.
The rule generalises: in any pipeline that combines sources, the timestamp on the output belongs to whichever source drives the output rate. Everything else is decoration attached to that moment.
What we would tell anyone building this
- Let the screen drive the clock. The camera follows and never blocks.
- Keep one camera frame in a slot and overwrite it. No queue, no waiting.
- Composite on the GPU. Nothing touches main memory between the surface and the writer.
- Use a radial mask, fill rather than fit, and crop above centre.
- Detect on a fraction of frames, on its own queue, never inline.
- Smooth the crop heavily and use a dead zone. Lag is what makes it look intentional.
- Hold position when the face is lost. Never recentre.
- Make the bubble movable during recording, and make sure the output moves with the preview.
The whole feature is about half a day of drawing code and about a week of deciding what not to do with it. The drawing is the easy part.