Bitrate, Resolution and File Size: Encoding a Screen Recording Properly
Bitrate, Resolution and File Size: Encoding a Screen Recording Properly
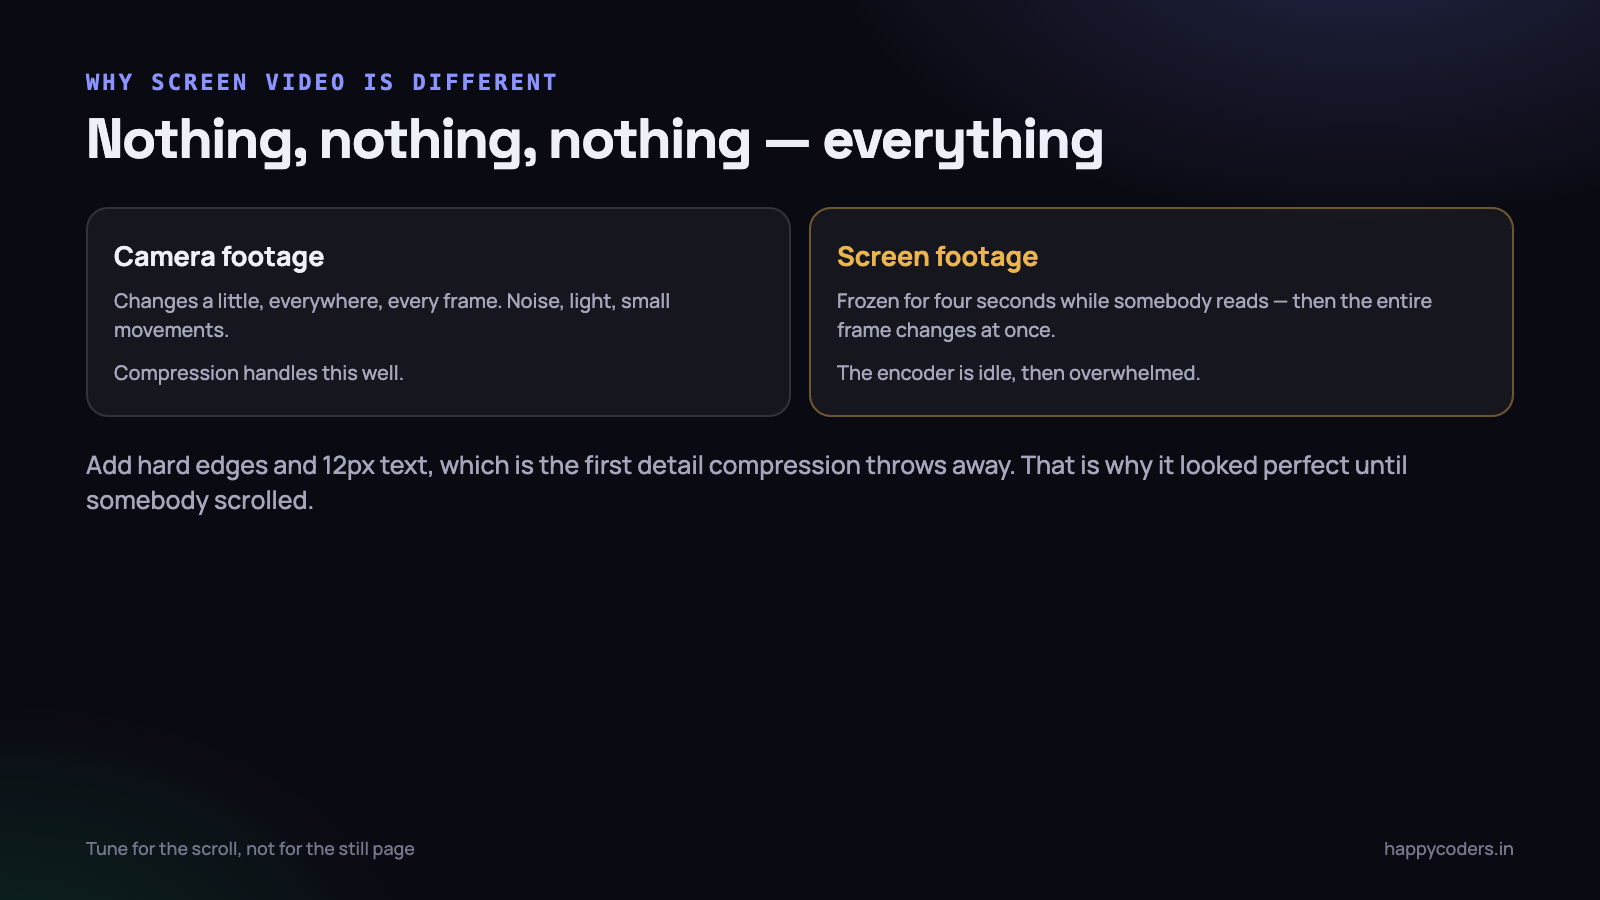
Screen recordings behave unlike any other video, and an encoder tuned for camera footage makes exactly the wrong decisions about them. The result is the familiar complaint: the recording looked perfect while the page was still, and turned to mush the moment somebody scrolled.
This is why that happens, and what to set instead.
Screen content is the opposite of camera content
A camera frame differs slightly from the one before it everywhere — noise, light, tiny movements. Compression handles this well, because the differences are small and spread out.
A screen is the opposite. Nothing changes for four seconds while somebody reads, then the entire frame changes at once when they scroll. The encoder is idle and then, for a few frames, asked to do an enormous amount of work. If the bitrate is a fixed average, those few frames get the same share as the still ones — and that is where the mush comes from.
A second difference matters just as much: screens are full of hard edges and small text. Compression discards high-frequency detail first, which on a face is invisible and on 12px text is the difference between readable and not.
Resolution: the number that changes everything
Resolution has more effect on file size than any other setting, because it multiplies. Halving both dimensions leaves a quarter of the pixels, and needs roughly a quarter of the bitrate for the same visual quality.
- A Retina MacBook display is captured at twice its logical size. A “1440×900” screen is really 2880×1800 pixels.
- Recording that natively gives a genuinely sharp file and a very large one.
- Recording at the logical size (1×) produces a file about a quarter the size that is still perfectly readable in a browser window, because that is the size the user was actually looking at.
For anything that will be watched in a window rather than full screen — which is most tutorials, demos and bug reports — 1× is the better default, and it is the single easiest way to make recordings shareable.
Always encode at an even width and height. Some encoders refuse odd dimensions outright, and a dragged selection produces odd numbers about half the time. Round down, never up, or the region can fall off the edge of the screen.
Frame rate: 30 is usually right
Screen recordings do not benefit from 60fps the way games do. A cursor moving and text appearing are perfectly smooth at 30, and doubling the frame rate doubles the work and the size for something almost nobody notices.
The exception is genuine motion: demonstrating an animation, a game, or a video playing inside your app. There, 60fps is worth the cost.
Below 30 is a false economy. At 15fps the cursor jumps between positions, and a viewer following a demonstration loses track of where it went.
Where the file size actually comes from
It is worth knowing the arithmetic, because it makes every other decision obvious. File size is essentially bitrate multiplied by duration:
size (MB) ≈ bitrate (Mbps) × duration (seconds) / 8

  8 Mbps × 600 s / 8  =   600 MB   (a ten-minute 1080p tutorial)
  3 Mbps × 600 s / 8  =   225 MB   (same length, 720p)
 25 Mbps × 600 s / 8  = 1,875 MB   (same length, 4K)
Two things follow from this. First, duration is as powerful a lever as any setting — cutting a twelve-minute recording to seven does more for the file than an hour of encoder tuning. Second, resolution matters mostly because of what it does to the bitrate you need, not directly.
This is also why the common advice to “just lower the bitrate” produces bad screen recordings. Lowering it to reach a size target works fine on a still page and fails precisely at the moments the viewer needs to see.
Bitrate: aim for the scroll, not the still
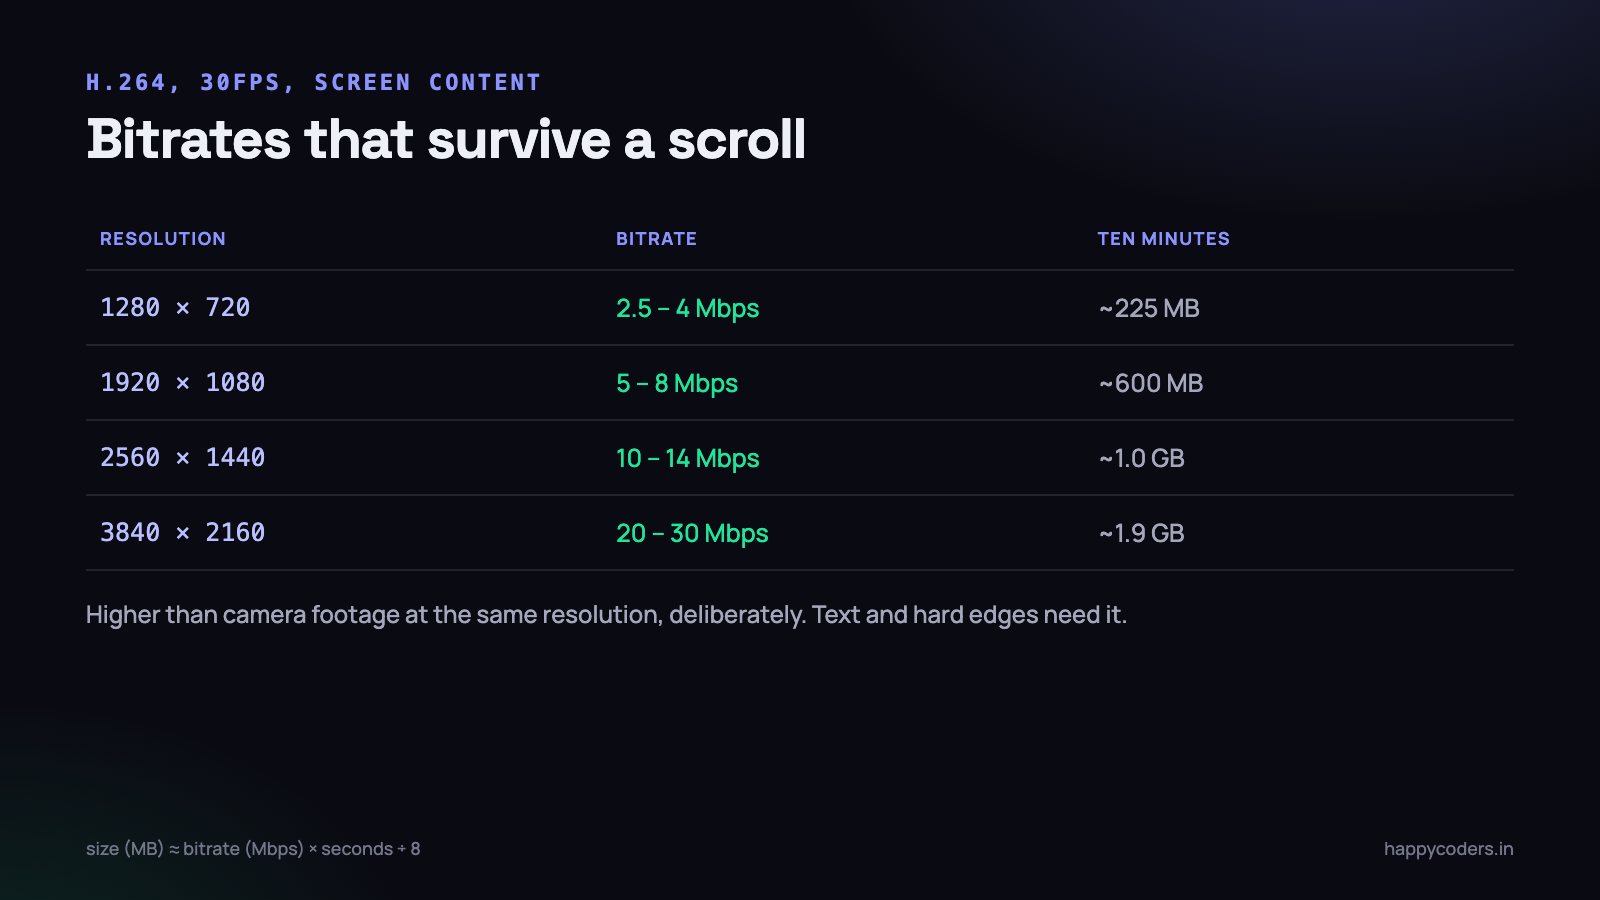
Because the demanding moments are brief and rare, screen recordings want a generous ceiling rather than a tight average. As rough starting points for H.264 at 30fps:
- 1280×720 — 2.5 to 4 Mbps
- 1920×1080 — 5 to 8 Mbps
- 2560×1440 — 10 to 14 Mbps
- 3840×2160 — 20 to 30 Mbps
Those are higher than the equivalent numbers for camera footage at the same resolution, deliberately. Text and hard edges need it.
If the encoder offers quality-based encoding — a constant quality factor rather than a target bitrate — prefer it for screen content. It spends bits where they are needed, which is exactly the pattern a screen produces: almost nothing for seconds, then a burst.
Keyframes and why scrolling looks worst
A keyframe is a complete picture; the frames between it are differences from it. Screen content produces long runs where nothing changes and then a frame that shares almost nothing with the previous one.
A keyframe interval of about two seconds is a reasonable default. Much longer and a scroll has to be reconstructed from a distant keyframe, which is precisely when quality collapses; much shorter and you spend bits repeating a static page.
If your encoder supports scene-change detection, leave it on. It inserts a keyframe when the picture changes drastically, which for a screen recording means at the start of each scroll — exactly where one is wanted.
Codec: H.264 unless you know otherwise
- H.264 — plays everywhere: every browser, every phone, every editor, every ticket system. Larger than the newer codecs and still the right default for anything you send to somebody else.
- HEVC / H.265 — roughly 30–50% smaller at the same quality, hardware-encoded on modern Macs, and not universally playable. Good for your own archive, risky for a file a client must open.
- ProRes — very large, effectively lossless, and the right choice only when the recording is a source file heading into heavy editing.
For a bug report or a tutorial going to a colleague, H.264 in an MP4 container removes an entire class of “it will not play’ replies.
Audio is not where the size is
Audio bitrate is a rounding error next to video, and people spend time on it anyway. AAC at 128 kbps mono is more than enough for narration; 96 kbps is fine. An hour of that is about 40 MB against several gigabytes of video.
What does matter is the sample rate matching the source, and not resampling more than once. Each conversion is a small loss for no benefit.
Choosing settings by destination
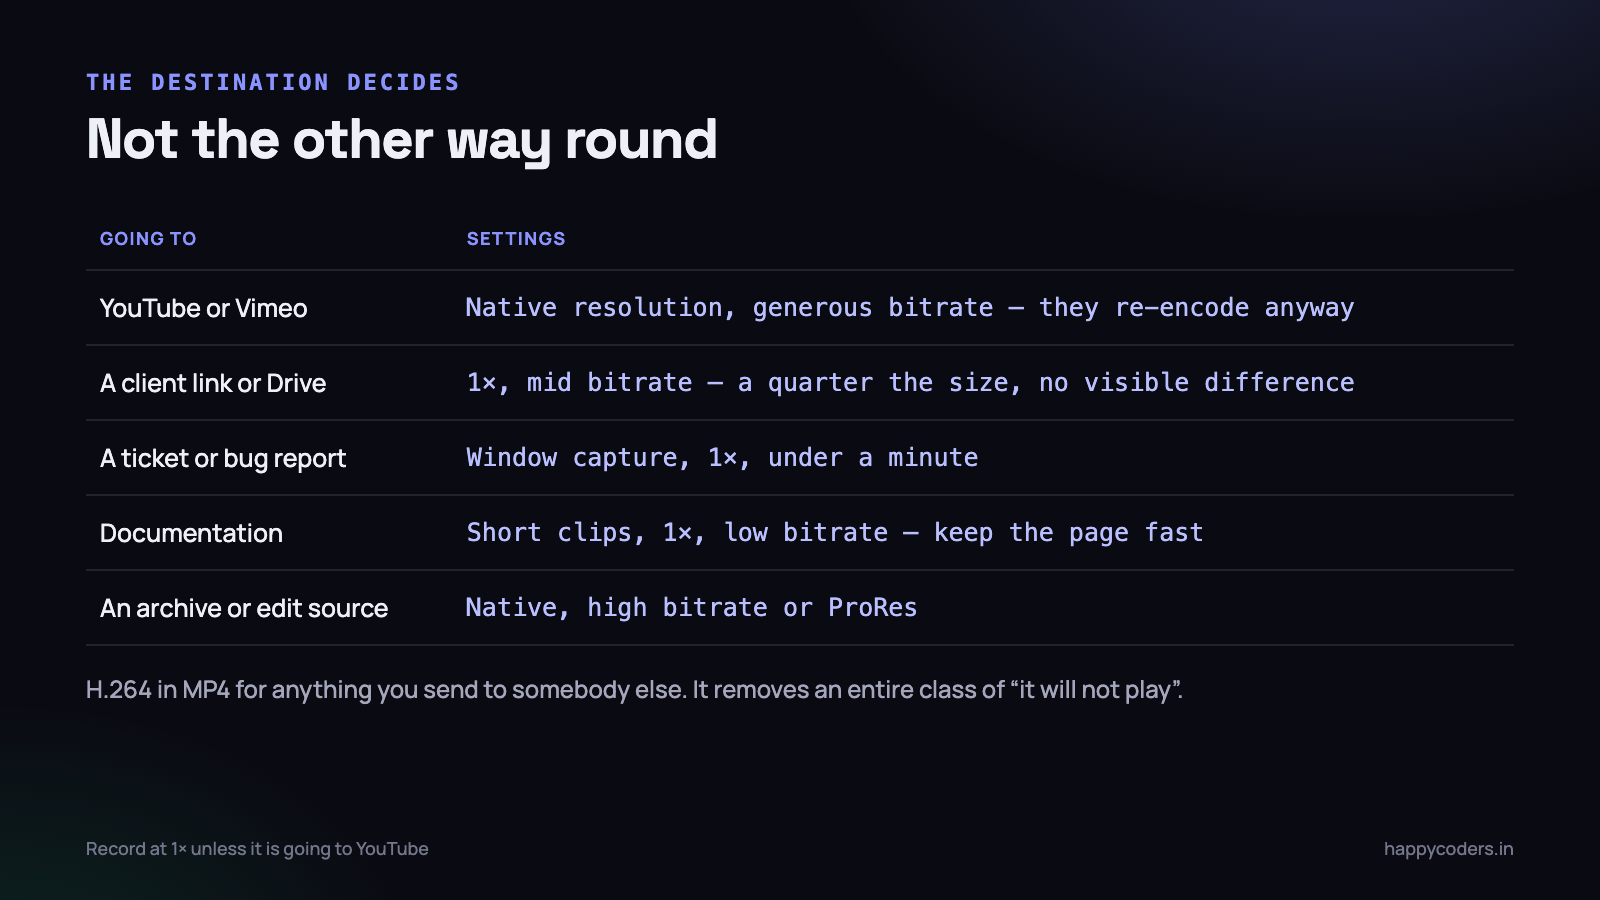
- YouTube or Vimeo — highest quality you can produce. They re-encode anyway, and a better source gives a better result. Native resolution, generous bitrate.
- A client link or Drive — 1× resolution, mid-range bitrate. A quarter of the size, no visible difference in a browser window.
- A ticket or bug report — window or area capture at 1×, lower bitrate, under a minute. The goal is that it uploads and plays, not that it is beautiful.
- Documentation — short clips, 1×, low bitrate, so the page stays fast.
- An archive or a source for editing — native resolution, high bitrate or ProRes. Storage is cheaper than re-recording.
What to check before you trust a setting
Encoding settings are easy to evaluate wrongly, because a still page looks fine at almost any bitrate. Test with the hard cases:
- Scroll a long page quickly. This is the single most revealing test. If text smears or blocks appear, the bitrate is too low or the keyframe interval too long.
- Read the smallest text you care about, at the size the viewer will watch — not full screen on your own display.
- Watch it on a phone. Most tutorials are watched on one, and detail that survives a 27-inch monitor can disappear.
- Check the file size against the destination. A perfect recording that will not upload is not a recording.
The practical answer
For most people the whole decision reduces to two choices: record at 1× rather than native Retina unless the file is going to YouTube, and use H.264 at 30fps with a generous bitrate. Everything else is refinement.
HappyRec exposes resolution as a simple choice rather than a table of numbers, encodes H.264, and writes the file continuously while recording, so a long session does not grow in memory and a crash at forty minutes still leaves forty minutes of valid video.
Variable, constant and quality-based encoding
Encoders offer several rate-control modes, and for screen content the choice matters more than the number you type into it.
- Constant bitrate (CBR) spends the same bits every second, whether the screen is frozen or scrolling. For screen content this is the worst of both worlds: wasteful while nothing moves, and starved exactly when something does. Use it only when a streaming protocol demands it.
- Variable bitrate (VBR) lets the encoder spend more on hard sections and less on easy ones, within an average. Much better for screens, and better still if the encoder lets you set a maximum well above the average — the headroom is what carries a scroll.
- Constant quality (CRF, or a quality slider) targets a visual quality instead of a size, and spends whatever that costs. For screen recordings this is usually the right choice: a still page costs almost nothing, and a scroll gets what it needs.
With H.264 CRF, lower numbers mean better quality and bigger files. Around 18 is visually lossless for most screen content, 23 is a sensible default, and 28 starts to show on small text. The unintuitive part is that the same CRF produces wildly different file sizes depending on the content — a recording of a static document is tiny, and one of continuous scrolling is not. That is the mode working correctly.
Why the recording gets big, in order of blame
- It is too long. Almost always the largest factor and the one nobody addresses. Record in sections.
- It is at Retina resolution. Four times the pixels for a file most people will watch in a window.
- The whole desktop is being captured when a single window would do — a 27-inch display is several times the area of the app.
- 60fps for content with no motion in it. Double the size for a difference nobody can see.
- A codec chosen for editing rather than sending. ProRes is enormous and correct only as a source file.
- Audio settings — last, and by a very long way. This is where most people start.
Work down that list in order and a 1.4 GB recording usually becomes about 80 MB without any visible loss, mostly through the first three items.
Re-encoding, and why to avoid doing it twice
Every lossy encode discards information permanently. Encoding a recording, editing it, and exporting again means the second encode is working from the first one’s compromises, and small text degrades noticeably by the third generation.
Two practical consequences:
- If a recording will be edited, capture it at high quality and accept the large intermediate file. Storage is cheap; a re-record is not.
- If it will not be edited, encode once at delivery settings and stop. Recording at maximum quality and then compressing for delivery is a wasted generation if no editing happened in between.
Trimming the start and end is the exception worth knowing: most editors can cut at keyframes without re-encoding at all, which is instant and lossless. If your tool offers a “trim without re-encoding” option, that is why it is so much faster.
A short practical recipe
If you want one set of defaults for everyday recordings that go to colleagues and clients:
- Capture the window or an area, not the whole screen.
- 1× resolution, not native Retina.
- 30fps, unless you are showing an animation.
- H.264 in MP4, constant quality around 22–23 if offered, otherwise 5–8 Mbps at 1080p.
- AAC 128 kbps mono for narration.
- Keyframes every two seconds, scene detection on.
- Keep it under three minutes and record a second clip if you need more.
That produces a file of roughly 40–70 MB for a three-minute recording, which uploads to anything, plays everywhere, and stays readable when somebody scrolls a page in it. Tune from there only if something specific is wrong — and test by scrolling, because that is the only moment the settings are really being asked to work.