Building a Capture Picker for Multiple Displays, Windows and Apps
Building a Capture Picker for Multiple Displays, Windows and Apps
The first version of our recorder had no picker. It recorded the main display, because that is the two-line version, and the two-line version is what you write while the interesting parts of the app are still unfinished.
It survived until the first user with two monitors, who recorded a forty-minute walkthrough of the wrong screen. The recording was perfect. It was of a mail client and a spreadsheet, on the display they were not demonstrating.
A picker sounds like interface work. Most of it is not. Deciding what the user is allowed to record, keeping that list fresh, showing what each choice looks like without setting the fans going, and handling the arrangement changing mid-session — that is where the time goes.
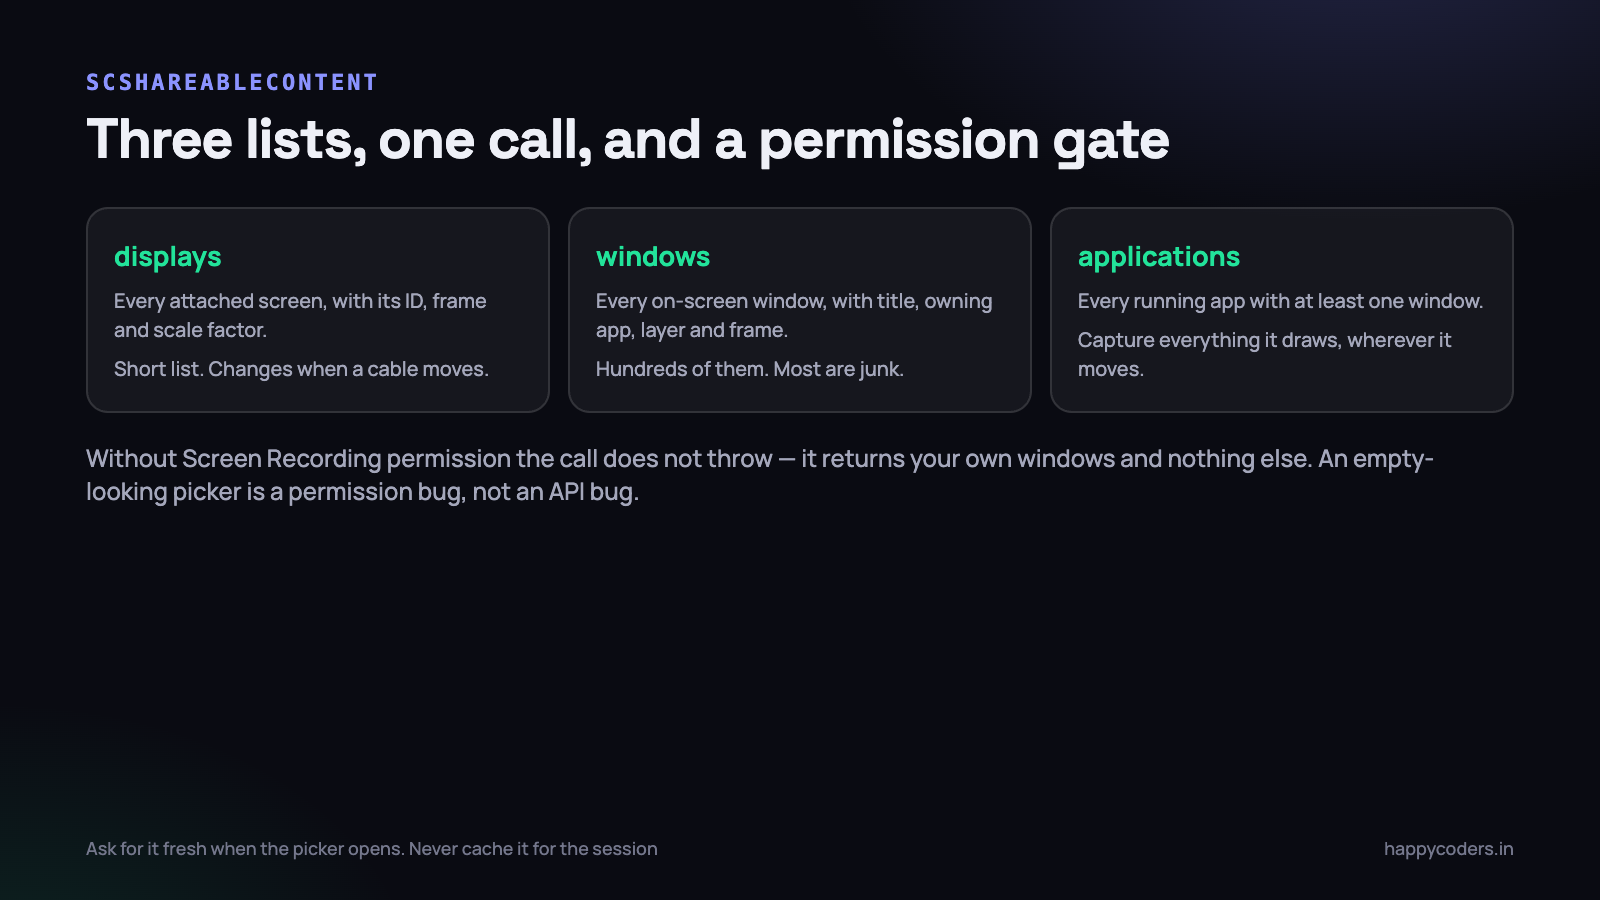
What SCShareableContent actually returns
One asynchronous call gives you everything the system is willing to let you record.
let content = try await SCShareableContent.excludingDesktopWindows(
    true, onScreenWindowsOnly: true)

content.displays       // [SCDisplay]     - usually 1 to 3
content.windows        // [SCWindow]      - 150 to 400 on a working machine
content.applications   // [SCRunningApplication]
Three things are worth knowing before you build an interface on top of this.
- It is a snapshot, not a live list. Nothing updates it. The moment you have it, it is already slightly out of date, and the user is about to open a window.
- It can be slow. On a machine with several hundred windows we have measured 80 to 300 milliseconds. That is fine once. It is not fine on a one-second timer.
- Without permission, it does not fail. It returns your own application’s windows and nothing else. A picker that shows one entry called “HappyRec” is not a bug in your filtering code — it is the permission state, which we will come back to.
How often to refresh it
We tried a two-second timer while the picker was open. It worked, and it also meant a 200-millisecond call every two seconds, tiles re-sorting themselves under the user’s cursor, and the occasional click landing on a window that had moved position in the list a frame earlier.
What we settled on refreshes on events rather than on a clock:
- When the picker opens. Always, with no cache. This is the one that matters.
- On
NSApplication.didChangeScreenParametersNotification. A display connected, disconnected, or moved in the arrangement. - On workspace notifications for applications launching and terminating, which covers most of the window list churn that a user would notice.
- On an explicit refresh control, because there will always be a case none of the above catches, and a small refresh button is cheaper than being clever.
What we do not do is re-sort on refresh. New entries are appended, missing ones are greyed out for a moment before being removed, and a selected entry that disappears stays visible with a message rather than vanishing under the pointer. The list should feel stable even when its contents are not.
Display, window or application: three different recordings
These are not three flavours of the same thing. They produce genuinely different files and they fail in different ways.
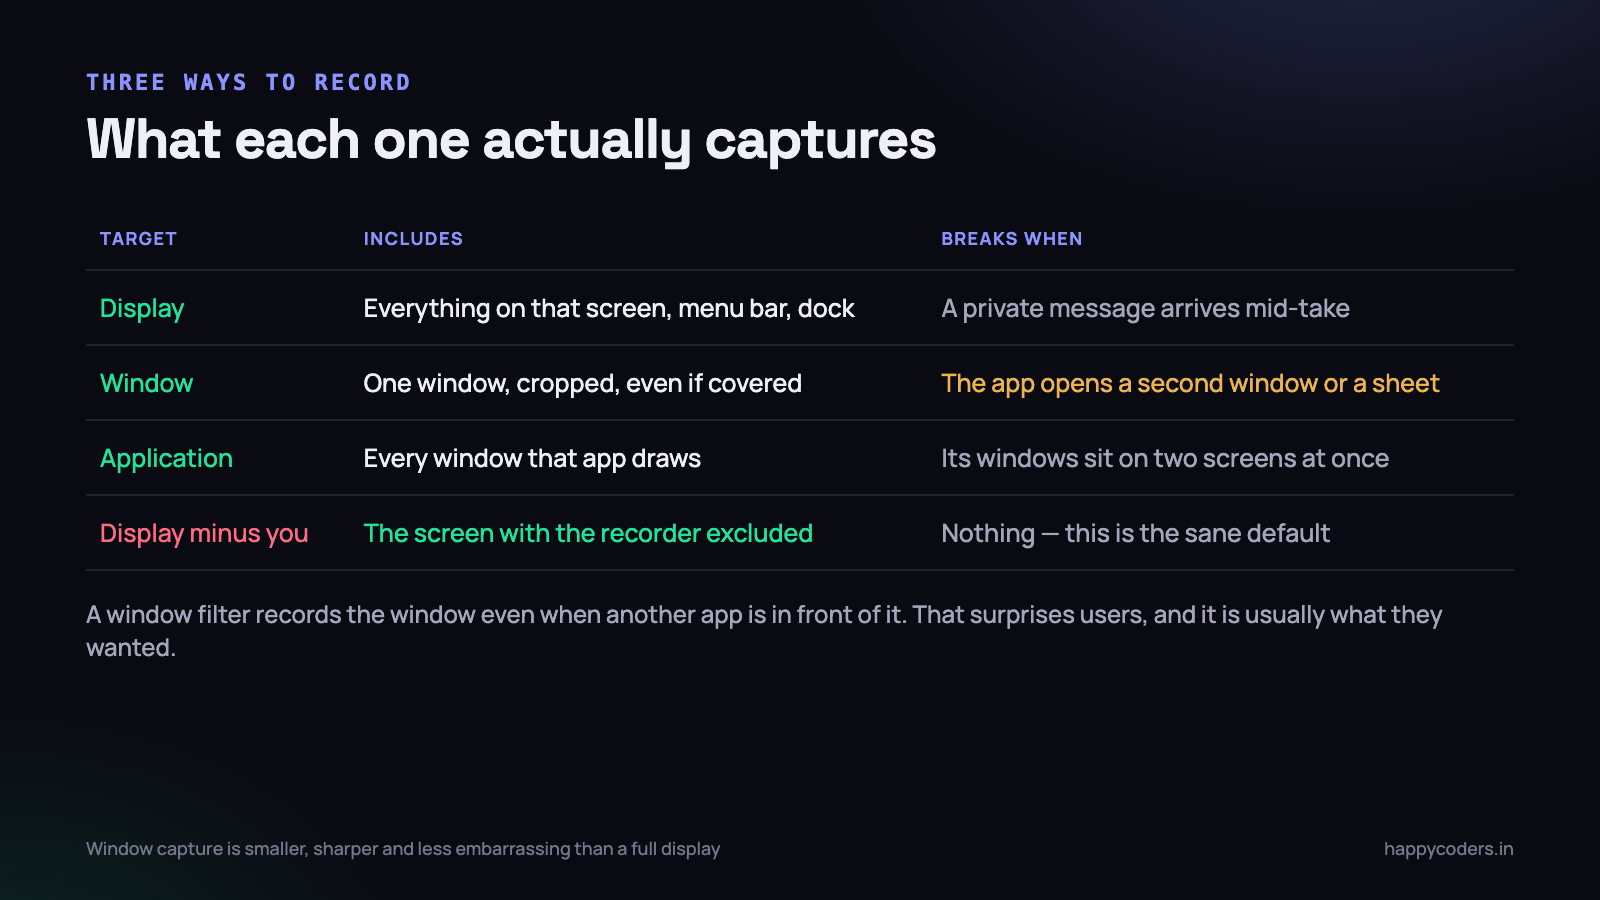
// a whole display, with our own app kept out of the picture
let filter = SCContentFilter(display: display,
                             excludingApplications: [ourApp],
                             exceptingWindows: [])

// one window, wherever it is, even if something is in front of it
let filter = SCContentFilter(desktopIndependentWindow: window)

// everything a given application draws, on this display
let filter = SCContentFilter(display: display,
                             including: [app],
                             exceptingWindows: [])
The window filter has a property that surprises people the first time they see it: it captures the window even when another window is on top. You can record a browser while reading your notes in front of it. Once users discover this, it becomes the mode they use for everything, and it is worth mentioning in the interface rather than leaving them to find it.
Window capture also produces a dramatically better file. A 1400-point window on a Retina display is a fraction of the pixels of a full 4K screen, the text is sharper because nothing is being scaled down, and the menu bar — with its clock, its battery, and whatever notification is about to arrive — is not in the recording at all.
If you offer only one mode, offer window capture. Full-display recording is the one that leaks a private message into a customer demo.
The application filter, and when it is the right answer
Application capture is the mode that gets built last and explained never, and there are two situations where it is exactly what somebody needs.
The first is an application that opens more than one window during the thing being recorded. A design tool with a floating inspector, an editor that opens a second document, anything with a modal sheet that is technically its own window — a window filter records the one window and the user watches their inspector disappear. An application filter keeps all of it.
The second is the reverse of that: recording everything one application does while deliberately excluding everything else on a busy desktop. A support engineer reproducing a bug wants the app and not the seventeen unrelated windows behind it, and does not want to think about which of the app’s windows might open.
The catch is that an application filter is still scoped to a display. If the application has windows on two screens, you get the ones on the display you named. That is rarely what the user pictured, so if a chosen application has windows on more than one display, say so in the picker and let them choose which screen — a single line of text that prevents a confusing recording.
The window list is mostly junk
Several hundred windows come back and perhaps fifteen are things a person would recognise. The rest are menu shadows, tooltips, status item backing windows, offscreen panels and one-pixel helpers. Show them raw and the picker is unusable.
let usable = content.windows.filter { w in
    guard let app = w.owningApplication else { return false }
    guard app.bundleIdentifier != Bundle.main.bundleIdentifier else { return false }
    guard w.isOnScreen, w.windowLayer == 0 else { return false }
    guard w.frame.width >= 120, w.frame.height >= 120 else { return false }
    let title = w.title ?? ""
    return !title.isEmpty || app.applicationName == "Finder"
}
.sorted { ($0.owningApplication?.applicationName ?? "")
        < ($1.owningApplication?.applicationName ?? "") }
windowLayer == 0 does most of the work — it is the normal window level, and panels, menus and overlays live above it. The size floor removes the invisible helpers. The title check removes the rest, with an exception for Finder, which has legitimate untitled windows.
Then group by application rather than presenting a flat list of eighty titles. People think in terms of “the browser”, not in terms of window handles, and a grouped list of twelve applications with their windows underneath is navigable in a way that a flat list never is.
Live thumbnails without melting the machine
A picker with static icons is honest but not useful, because half the entries are the same application and the title is often not enough to tell two windows apart. Live thumbnails solve that instantly, and they are also the easiest way to build something that makes a MacBook audible.
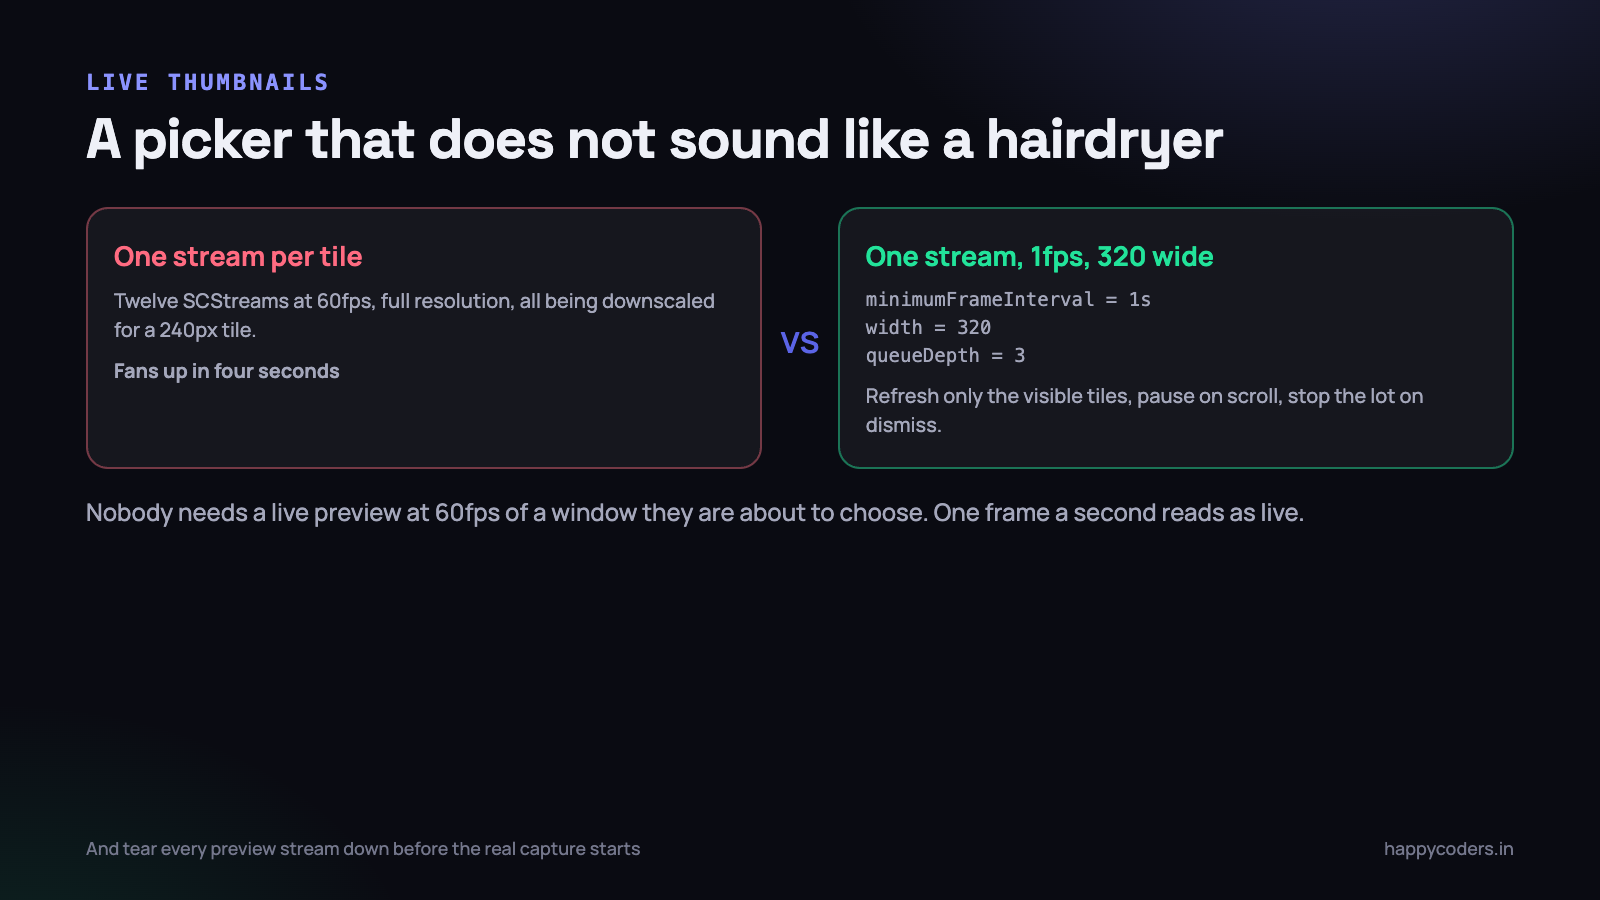
The naive version creates a full-configuration SCStream per tile. Twelve of those at native resolution and 60fps is twelve capture pipelines, each producing far more data than a 320-pixel tile can display, all being downscaled on the way to the screen.
func previewConfig() -> SCStreamConfiguration {
    let cfg = SCStreamConfiguration()
    cfg.width  = 320
    cfg.height = 180
    cfg.minimumFrameInterval = CMTime(value: 1, timescale: 1)  // 1 fps
    cfg.queueDepth = 3
    cfg.showsCursor = false
    cfg.pixelFormat = kCVPixelFormatType_32BGRA   // going to a layer
    cfg.scalesToFit = true
    return cfg
}
Four rules kept ours quiet:
- One frame a second, at tile resolution. Ask capture for 320 pixels wide and it scales on the GPU before the frame ever reaches you. The saving is not marginal; it is the whole cost.
- Only the visible tiles. Start a preview when a tile scrolls into view, stop it when it leaves. Twelve tiles in a scroll view are rarely twelve tiles on screen.
- Pause during scrolling. Nobody is inspecting a thumbnail while flicking past it.
- Stop every preview before the real capture begins. We shipped a build that left previews running during recording, and it cost about eight per cent of a core and a handful of dropped frames on older machines.
There is a cheaper option worth knowing about: SCScreenshotManager will give you a single image of a filter without a stream at all. For displays, which change slowly and are few, a still refreshed every couple of seconds is indistinguishable from live and costs almost nothing.
Keeping your own window out of the recording
A recorder that appears in its own recording looks amateurish, and worse, a recorder whose control bar is in the recording is capturing a moving overlay that was never part of the content.
For display capture, excludingApplications: with your own SCRunningApplication handles it — but you have to find yourself in the list first, and the bundle identifier is the reliable way to do that. Excluding by name fails the moment somebody renames the app in a build.
let ourApp = content.applications.first {
    $0.bundleIdentifier == Bundle.main.bundleIdentifier
}
let filter = SCContentFilter(display: display,
                             excludingApplications: ourApp.map { [$0] } ?? [],
                             exceptingWindows: [])
Two things this does not cover. A floating control bar that the user genuinely wants in shot — some people record with the timer visible on purpose — needs an option, because excluding the whole application excludes it too. And if your recorder puts a selection overlay on screen, that overlay is a window of your application and vanishes from the recording along with everything else, which is usually right but occasionally confusing when someone is trying to record your own app for a bug report.
For window capture the question does not arise: a desktopIndependentWindow filter captures that window and nothing else, so your interface can sit right on top of it.
When the window moves to another display
This is the case nobody designs for and every two-monitor user eventually triggers. A window is being recorded, and halfway through the take it is dragged onto the other screen.
With a window filter the capture follows it, which is the right behaviour and also the start of the problem. The two displays may differ in scale factor, refresh rate and colour space. A 1400-point window is 2800 pixels on a Retina panel and 1400 on an external one, and your AVAssetWriter was configured with a fixed output size before any of this happened.
- Fix the output dimensions at the start and set
scalesToFit, so a window that changes pixel size is scaled into the frame you already promised the writer. A brief softness is acceptable. A writer rejecting every subsequent frame is not. - Never reconfigure the writer mid-recording. The output dimensions of an
AVAssetWriterInputare set once. If the incoming frames stop matching, the sensible response is to scale them, not to start a second file. - Expect the frame rate to change. Moving from a 120Hz panel to a 60Hz one changes how often frames arrive. Honouring the capture timestamps rather than assuming a fixed interval means this simply works.
- Watch for the display going away entirely. A window can be on a display that is unplugged, which is a different situation from the window closing — we wrote about what happens when a display disconnects mid-recording separately, and a picker needs to survive it too.
There is one more wrinkle that took us an afternoon to pin down. The scale factor is carried on the content filter as pointPixelScale, and it is read when you build the filter, not continuously. A window that starts on a Retina panel and moves to a 1× external display keeps producing frames at the size the filter was created with until something forces a reconfiguration. Fixing the writer dimensions at the start and scaling into them makes this a non-event; trying to track the true pixel size frame by frame does not.
Display capture behaves differently and more simply: the filter is bound to a display ID, so moving a window off that display means it leaves the recording. That is correct, and users occasionally find it startling. A short line in the interface saying which screen is being recorded prevents most of the confusion.
The permission dance
Everything above assumes the system is willing to tell you what is on screen. The first time a user opens the picker, it is not.
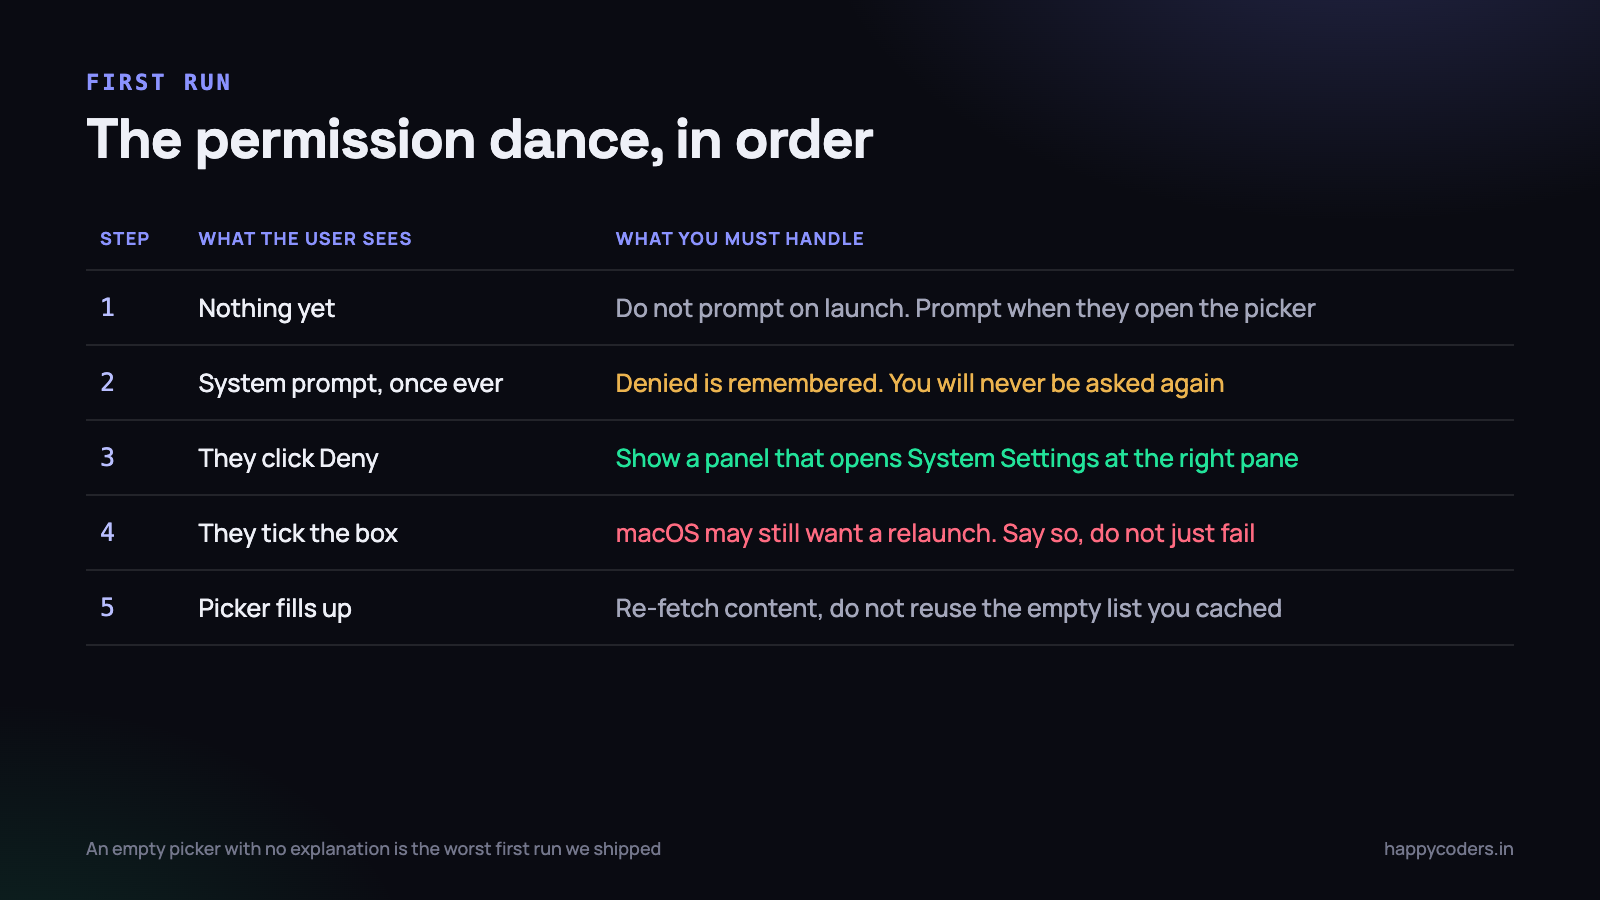
Screen Recording consent is granted once, remembered forever, and cannot be re-prompted by your application. If the user clicks Deny, that is the end of the automatic route: every later attempt returns an empty-looking content list with no error and no dialog. This is the single most important thing to design for, because a first-run denial is common — people click Deny when a prompt appears before they understand what the app is for.
// true if we already have it; does not prompt
let granted = CGPreflightScreenCaptureAccess()

if !granted {
    // prompts, but only the very first time in the app's life
    CGRequestScreenCaptureAccess()
}

func openScreenRecordingSettings() {
    let s = "x-apple.systempreferences:com.apple.preference.security" +
            "?Privacy_ScreenCapture"
    if let url = URL(string: s) { NSWorkspace.shared.open(url) }
}
The rules that came out of getting this wrong:
- Do not prompt on launch. A permission request with no context is a request to be denied. Prompt when the user opens the picker, because by then they have asked for something that obviously needs it.
- Detect the empty list and explain it. If the content call returns only your own windows, that is the denied state. Show a panel that says so and offers a button to the right settings pane — not a picker with nothing in it.
- Warn about the relaunch. Depending on the macOS version, granting the permission while the app is running may not take effect until it restarts. Offering to relaunch is far better than appearing broken.
- Re-fetch after a grant. The cached empty list is still empty. We shipped that bug: the user granted permission, came back, and the picker was still empty until they quit the app.
The states this produces, and how they present themselves, are worth enumerating properly — we went through all four permission states in ScreenCaptureKit in more detail elsewhere, because getting it wrong makes a working recorder look broken on the one screen every new user sees.
Small things that made the picker feel finished
- Remember the last choice by window title and bundle identifier, and pre-select it if it still exists. Most recording is repeated recording of the same thing.
- Label displays the way the system does — “Built-in Retina Display”, “DELL U2720Q” — and show the resolution. “Display 1” means nothing to somebody with three screens.
- Show the output size for each option before recording starts. Seeing “3840 × 2160” next to a display and “1512 × 982” next to a window teaches file-size sense better than any settings screen.
- Make the thumbnails clickable targets, not decorations. They are the largest thing in the tile; they should select it.
- Handle the empty case for windows. A machine with everything minimised has no on-screen windows, and the correct response is a sentence, not a blank panel.
What to do on Monday morning
- Plug in a second display and record something. If your recorder has no way to choose which screen, that is the first bug, and it is invisible to everyone who develops on a laptop.
- Open Activity Monitor while your picker is on screen. If the process is using more than a few per cent of a core to show thumbnails, drop the preview frame rate to one per second and set the capture width to the tile width.
- Create a fresh macOS user account, run your app there, and click Deny on the permission prompt on purpose. Whatever you see next is your real first-run experience for a meaningful share of users.
- Add the bundle-identifier exclusion for your own application to display capture, and check a recording to confirm your control bar is genuinely absent.
- Record a window, drag it to another display mid-take, and play the file back. If it stops recording or the file ends early, fix the output size handling before anybody reports it.