Notarising a Mac App You Ship Outside the App Store
Notarising a Mac App You Ship Outside the App Store
The message a user sends you looks like this: a screenshot of a dialog saying the app cannot be opened because Apple cannot check it for malicious software, and a one-line question asking whether the download is safe.
We got that message from three people on the day we first put a DMG on our own website. The app was signed. It opened perfectly on every machine in the office. It was not notarised, and the difference between those two facts is the whole of this article.
Shipping a Mac app outside the App Store is completely supported and reasonably straightforward, but the steps are not discoverable. Nothing tells you they are missing until a stranger’s Mac refuses to open your app.
Developer ID is not the same certificate as an App Store build
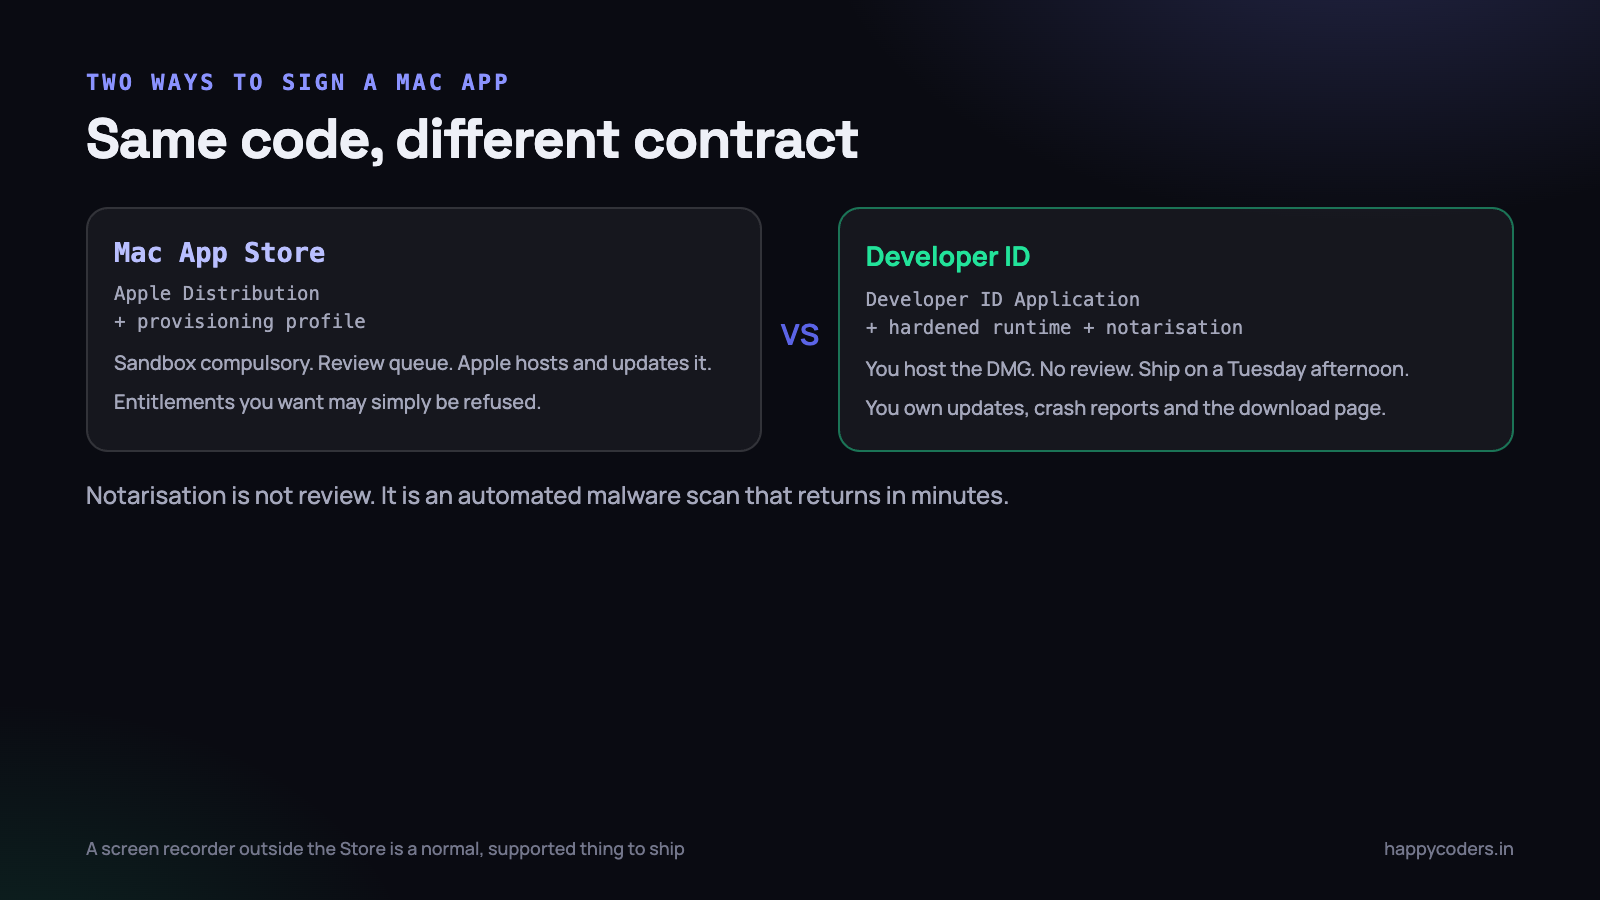
Xcode will happily hand you several signing identities and they are not interchangeable. An App Store build is signed with an Apple Distribution certificate and a provisioning profile, uploaded, reviewed, and hosted by Apple. A direct download is signed with a Developer ID Application certificate, notarised by an automated service, and hosted by you.
- App Store — the sandbox is compulsory, review takes days and can come back with an opinion, and some entitlements will simply be refused. We have written before about the four rejections that taught us the most, and none of them were about code quality.
- Developer ID — no review, no sandbox requirement, a release whenever you decide. In exchange you own hosting, updates, the download page and every support conversation about Gatekeeper.
For a screen recorder the second route is the normal one. The features people want from a recorder sit awkwardly with the sandbox, and a tool that saves large files wherever the user points it is a tool that spends its life negotiating with security-scoped bookmarks if you take the other road.
Notarisation is not review. No human looks at it. It is an automated scan for malware and for signing mistakes, and it usually answers in under five minutes.
The hardened runtime, and what it costs you
Notarisation requires the hardened runtime, which switches on a set of protections that are otherwise off: no unsigned code injection, no arbitrary library loading, no debugger attaching, no writable-executable memory. Each protection has an entitlement that disables it, and every one of those entitlements is a promise you are making about your own code.
The temptation, when a build fails, is to add exceptions until it stops failing. That works and it is how most apps end up shipping with entitlements they do not use.
<?xml version="1.0" encoding="UTF-8"?>
<plist version="1.0">
<dict>
  <key>com.apple.security.device.audio-input</key>
  <true/>
  <key>com.apple.security.files.user-selected.read-write</key>
  <true/>
</dict>
</plist>
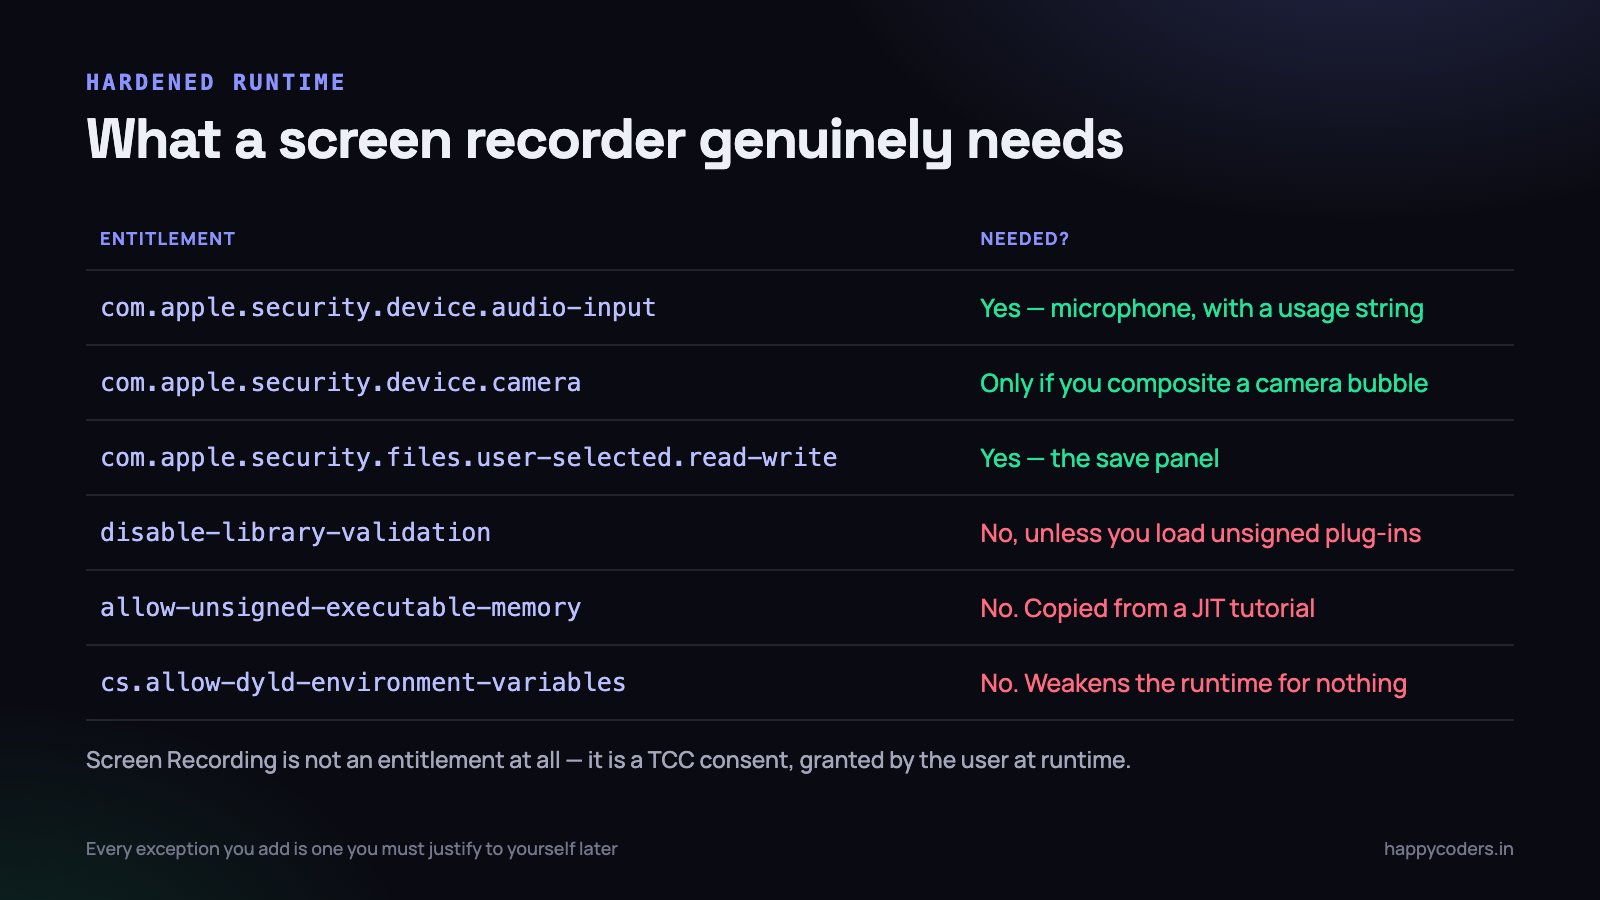
That is the whole entitlements file for a recorder that captures the screen, records the microphone and saves to a location the user chooses. Two keys. Things that are conspicuously not in it:
- There is no screen recording entitlement. Screen capture is not gated by an entitlement at all — it is a TCC consent that the user grants at runtime, and adding a made-up key for it does nothing.
- No
disable-library-validationunless you genuinely load plug-ins you did not sign. Audio apps that host third-party units need it. A recorder does not. - No
allow-unsigned-executable-memory. This gets copied from tutorials written for JIT runtimes and weakens the process for nothing. - No
allow-dyld-environment-variables, which exists to let debugging tools inject libraries and should never ship in a release build.
The usage strings are a separate thing that people conflate with entitlements. NSMicrophoneUsageDescription and, if you composite a camera, NSCameraUsageDescription go in Info.plist, and an app that touches the microphone without one does not get a prompt — it is terminated on the spot.
Signing order, and why not to use deep
A bundle is signed from the inside out. Frameworks, helper tools and XPC services first, each with its own signature, and the .app last so that its seal covers the already-signed contents.
IDENT="Developer ID Application: Happy Coders (ABCDE12345)"

# inner code first, one at a time
for f in HappyRec.app/Contents/Frameworks/*; do
  codesign --force --options runtime --timestamp --sign "$IDENT" "$f"
done

# the app bundle last, with the entitlements
codesign --force --options runtime --timestamp \
  --entitlements HappyRec.entitlements \
  --sign "$IDENT" HappyRec.app

codesign --verify --deep --strict --verbose=2 HappyRec.app
Three flags matter and one is a trap. --options runtime enables the hardened runtime and without it notarisation fails outright. --timestamp contacts Apple’s timestamp server so the signature remains valid after the certificate expires; leave it out and the app starts failing on a date you will not anticipate. Verification with --deep is fine.
Signing with --deep is the trap. It signs nested code with the outer entitlements and in the wrong order, and it produces bundles that pass locally and fail notarisation with an error that does not mention --deep at all. Sign each piece explicitly.
notarytool, and the wait
Store the credentials once in the keychain so the token is not sitting in a shell script or a CI log. The password is an app-specific password from the Apple ID site, not your account password.
xcrun notarytool store-credentials "hc-notary" \
  --apple-id "dev@happycoders.in" \
  --team-id "ABCDE12345" \
  --password "abcd-efgh-ijkl-mnop"

xcrun notarytool submit HappyRec-1.4.dmg \
  --keychain-profile "hc-notary" --wait
The --wait flag blocks until the service answers, which in our experience is two to six minutes, occasionally fifteen, and once on a Friday evening about forty. Build that into your expectations: notarisation is not a step you can do in the ninety seconds before a meeting, and a release process that assumes it is instant will eventually ship something unnotarised because somebody got impatient.
It is also worth understanding what the service is checking, because it is narrower than most people assume. It looks for known malware, and it verifies that everything executable in the bundle is signed correctly, with the hardened runtime, with a secure timestamp, and with no entitlements a Developer ID build is not allowed to carry. It does not look at what your app does, it does not care whether it is any good, and it will notarise a badly written recorder as cheerfully as a good one.
When it fails, the summary tells you almost nothing. The log tells you everything, and you have to ask for it.
xcrun notarytool log <submission-id> \
  --keychain-profile "hc-notary" notary-log.json
Nearly every rejection we have had came back as one of four things: a nested binary that was not signed, a binary signed without the hardened runtime, a missing secure timestamp, or an entitlement not permitted with a Developer ID certificate. The log names the exact file path in each case, which turns a mystifying failure into a two-minute fix.
Stapling, and the laptop with no internet
Notarisation registers your app with Apple. It does not change the file on your disk. When a user opens an app for the first time, Gatekeeper looks for a notarisation ticket — and if the ticket is not attached to the app, it asks Apple’s servers over the network.
Stapling attaches the ticket to the file so that no network call is needed.
xcrun stapler staple HappyRec.app
xcrun stapler staple HappyRec-1.4.dmg
xcrun stapler validate HappyRec-1.4.dmg
Skip it and you have an app that works on every machine you test, because every machine you test has good internet. Then somebody downloads it at the office, takes the laptop home, opens it on a train, and the app refuses to launch — not slowly, not with a warning, but with a hard refusal, because Gatekeeper cannot reach the service that would vouch for it.
Even with a network, an unstapled app takes a visible pause on first launch while that check happens. Twenty seconds of a bouncing icon is enough for a user to decide the app is broken and go elsewhere.
Staple the app and the disk image. Stapling one does not staple the other, and the DMG is what the user actually double-clicks first.
What the user sees for each failure
Gatekeeper’s messages are famously unhelpful, and learning to map them back to causes saves a great deal of guessing.
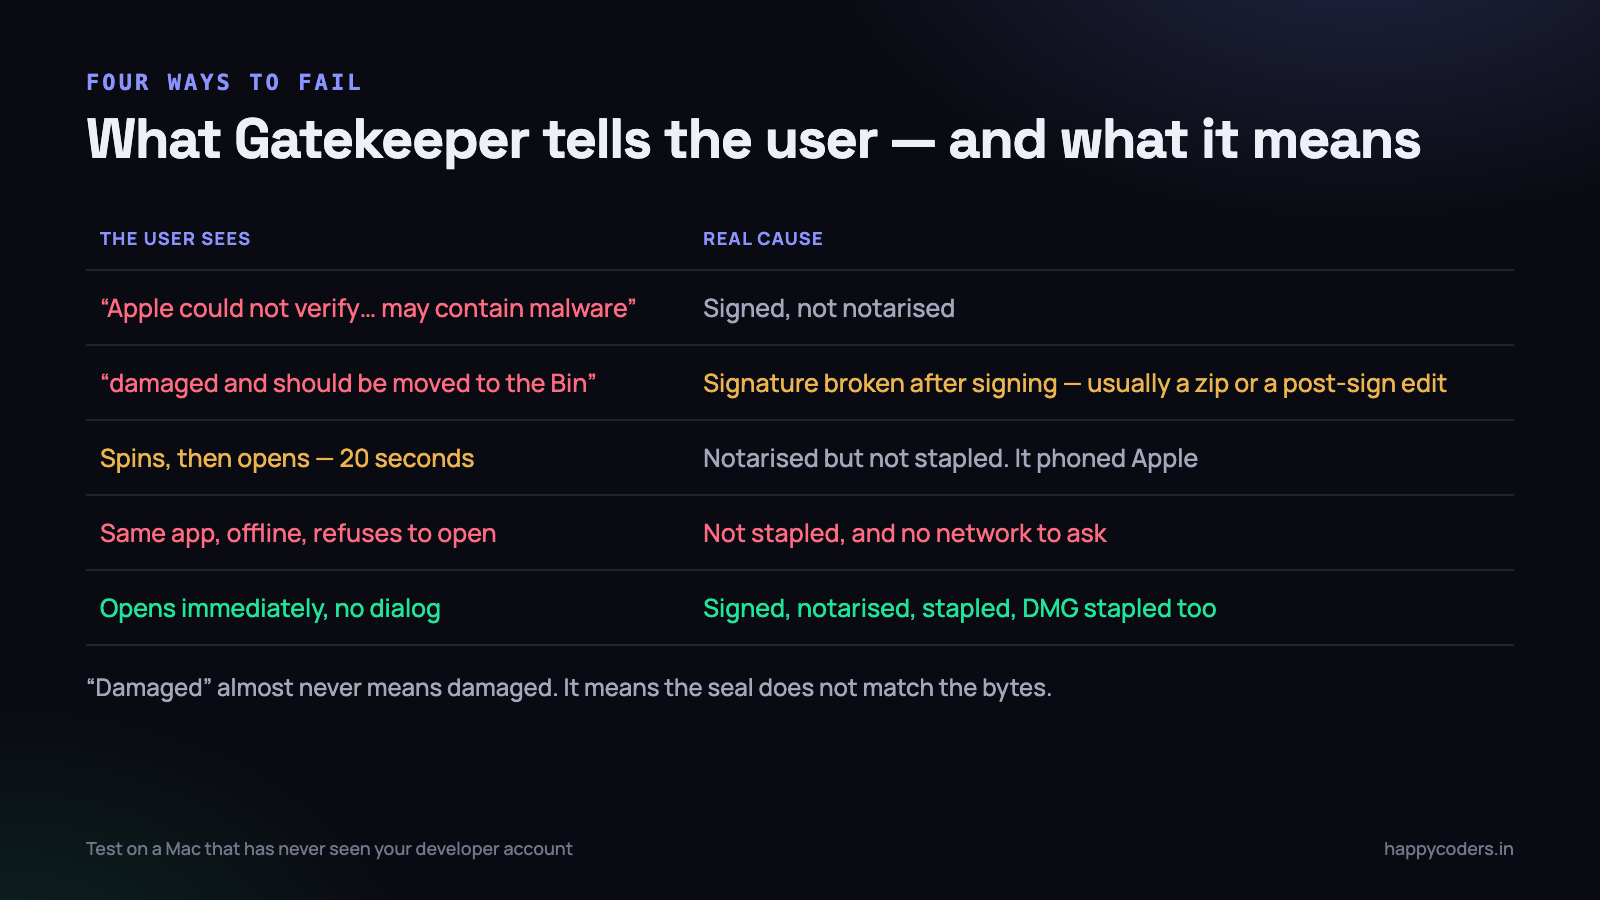
- “Apple could not verify it is free of malware” — signed but not notarised. The submission was never made, or it failed and nobody read the log.
- “The application is damaged and should be moved to the Bin” — the signature no longer matches the bytes. Almost always something edited the bundle after signing: a resource copied in, a plist rewritten, or a zip round-trip that mangled symlinks.
- A long pause on first launch, then it opens — notarised but not stapled, and it just phoned home. Works, looks broken.
- Fine on your machine, refuses on a colleague’s — you have a developer certificate in your keychain and a security assessment cache that they do not. Never accept your own machine as evidence.
- Opens with no dialog at all — signed, notarised, stapled, DMG stapled. This is the target, and it is achievable; a correctly notarised app opens on first launch with no Gatekeeper dialog whatsoever.
The word “damaged” is the one that wastes the most time, because it sends people looking for a corrupt download. The file is fine. The seal does not match, and the usual culprit is a build step that touches the bundle after codesign ran.
The quarantine flag, and the right-click myth
All of this only happens because of a single extended attribute. Anything downloaded by a browser arrives with com.apple.quarantine set on it, and that attribute is what makes Gatekeeper evaluate the file on first launch. Copy the same app over from a USB stick or with scp and there is no quarantine flag, no evaluation, and no dialog — which is exactly why an unnotarised build can pass round an office for weeks without anybody noticing.
xattr -l HappyRec.app          # does it carry com.apple.quarantine?
xattr -dr com.apple.quarantine HappyRec.app   # clears it locally only
Two conclusions follow. First, never test a release by copying it out of your build directory; download it from the URL your users will use, or you are testing a file that Gatekeeper never inspects. Second, do not put “right-click and choose Open” on your download page. It is real advice that works, and it teaches people to bypass the exact protection that is telling them something is wrong with your build. We had it on ours for two weeks and it is the piece of copy we are least proud of.
A stable signing identity is worth more than it looks
Screen recording and microphone consent are stored by TCC against your application, and the record is keyed on the bundle identifier together with the code signing identity. Keep both stable and a user grants permission once, for the life of the app, across every update you ship.
Change either and the grant is gone. Every user is prompted again after an update, and because Screen Recording is the permission that cannot be re-prompted cleanly once denied, some of them will end up in a state where your app looks broken and the fix is buried in System Settings. Renaming the bundle identifier “to tidy things up”, switching teams, or shipping a build signed with an ad-hoc identity will all do it.
This is a good reason to get the identifier right before the first public release, and a better reason to keep one Developer ID for the product rather than signing releases from whichever machine is free.
The disk image is a shipped artefact too
A DMG is not just packaging. It is the file the user downloads, the file Gatekeeper evaluates first, and it needs the same treatment as the app inside it.
create-dmg \
  --volname "HappyRec" \
  --window-size 540 380 \
  --icon "HappyRec.app" 130 180 \
  --app-drop-link 400 180 \
  "HappyRec-1.4.dmg" "build/release/"

codesign --force --timestamp --sign "$IDENT" HappyRec-1.4.dmg
The order is fixed and the mistakes are predictable. Sign the app, build the DMG around the signed app, sign the DMG, submit the DMG for notarisation, staple both. Notarising the app first and then building a DMG means an unstapled disk image; building the DMG before signing the app means shipping an unsigned app inside a signed container.
Two practical notes. Prefer a DMG over a zip: zip archives do not carry a staple, so a zipped app has to phone home on first launch even when it is notarised. And avoid changing anything inside the image after it is built, including an innocent-looking tweak to the background picture, because the signature covers the whole image.
A release that takes ten minutes
The first release we did by hand took an afternoon, and about half of it was rediscovering the order of operations. The second one took ten minutes because we had written it down. The third took ten minutes because it was a script.
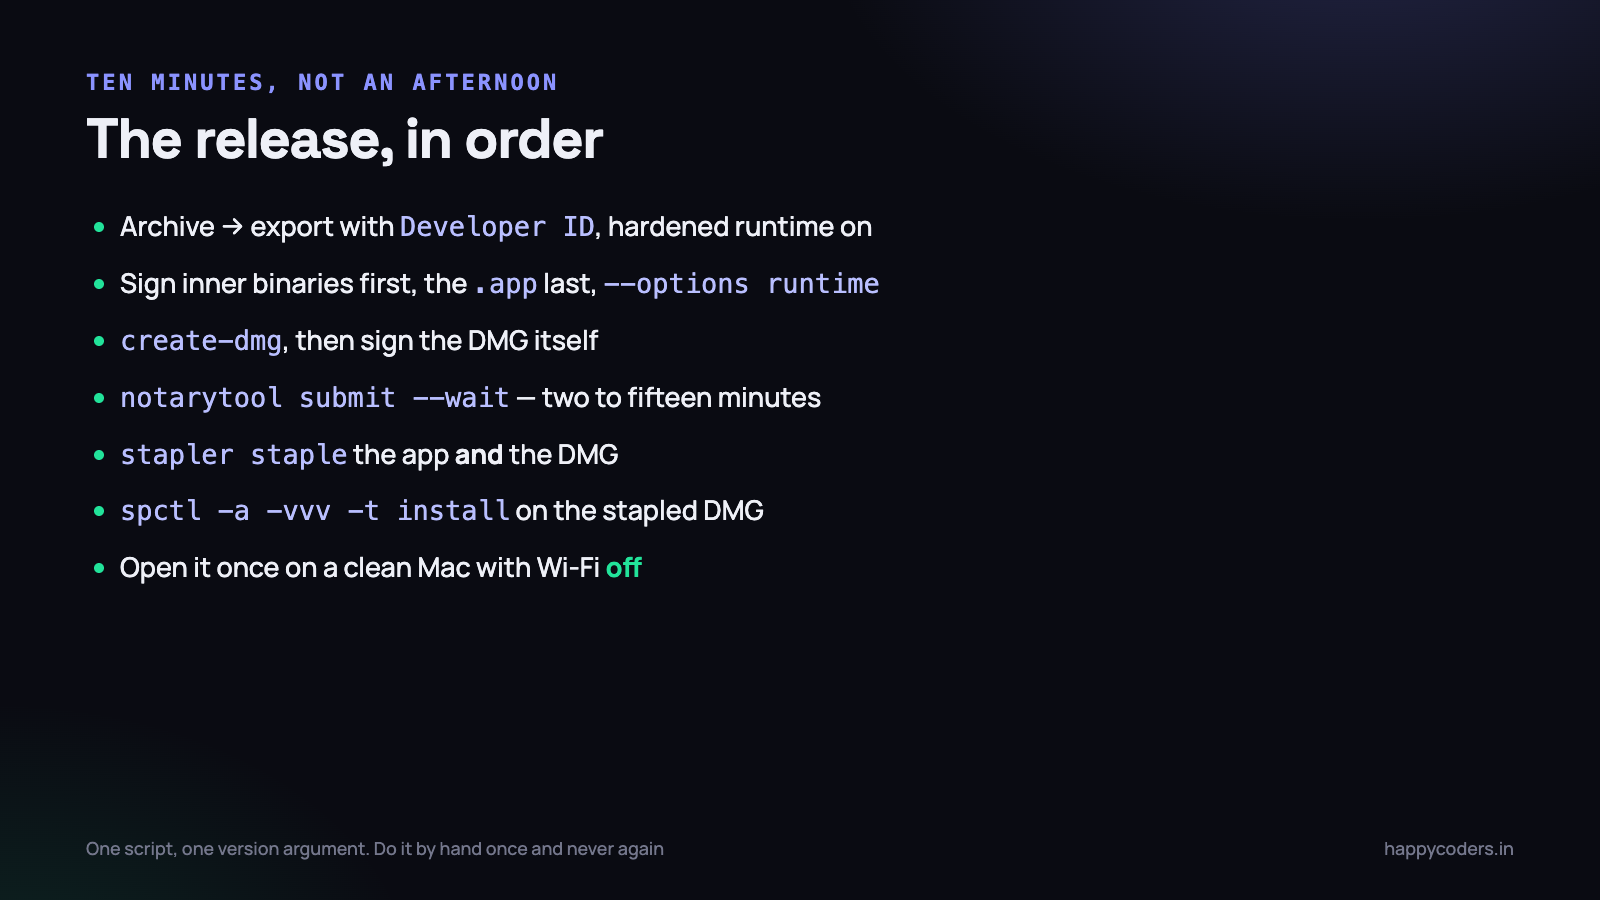
#!/bin/bash
set -euo pipefail
VERSION="$1"
IDENT="Developer ID Application: Happy Coders (ABCDE12345)"

xcodebuild -scheme HappyRec -configuration Release archive \
  -archivePath "build/HappyRec.xcarchive"
xcodebuild -exportArchive -archivePath "build/HappyRec.xcarchive" \
  -exportOptionsPlist export-developer-id.plist \
  -exportPath "build/release"

codesign --verify --deep --strict --verbose=2 "build/release/HappyRec.app"

create-dmg --volname "HappyRec" "HappyRec-$VERSION.dmg" "build/release/"
codesign --force --timestamp --sign "$IDENT" "HappyRec-$VERSION.dmg"

xcrun notarytool submit "HappyRec-$VERSION.dmg" \
  --keychain-profile "hc-notary" --wait
xcrun stapler staple "HappyRec-$VERSION.dmg"
xcrun stapler validate "HappyRec-$VERSION.dmg"
spctl -a -vvv -t install "HappyRec-$VERSION.dmg"
The two verification lines at the end are the ones that earn their place. stapler validate proves the ticket is attached; spctl -a -vvv -t install asks the same system that will evaluate the user’s download whether it is acceptable, and prints source=Notarized Developer ID when it is.
One thing a script cannot do for you: open the stapled DMG on a Mac that has never had your developer account on it, with the Wi-Fi switched off. That is the actual test. Everything else is a rehearsal on a machine that is already predisposed to trust you.
Things worth knowing before the first release
- Certificates expire, typically after five years, and a lapsed Developer ID means no new releases until it is renewed. The timestamp keeps already-shipped builds working; it does not help you sign a new one.
- A revoked certificate is different. If a Developer ID is revoked, already-distributed apps stop opening. This is the reason to guard the private key properly rather than leaving it on a shared build machine.
- Keep every submission id. Notarisation history is queryable and it is the fastest way to establish whether the build a customer has is one you actually shipped.
- Automatic updates are now yours. Sparkle is the conventional answer, and its appcast needs signing too — an update channel is a code-distribution channel.
- Test on the oldest macOS you claim to support. The Gatekeeper messages differ between versions, and so does whether a permission change needs a relaunch.
What to do on Monday morning
- Run
spctl -a -vvv -t installon the installer you currently ship. If it does not saysource=Notarized Developer ID, your users are seeing a warning you have not seen. - Run
xcrun stapler validateon the same file. If it fails, you are notarised but not stapled, and everyone without a good connection is having a bad first launch. - Open your entitlements file and delete every key you cannot justify in one sentence. Rebuild and confirm nothing breaks; usually nothing does.
- Write the release steps into one script with a version argument, today, while you still remember the order. The script is thirty lines and it removes the failure mode where a tired person skips stapling.
- Borrow a Mac that has never seen your developer account, turn off its Wi-Fi, and open your DMG. Ten minutes of someone else’s laptop is worth more than any amount of testing on your own.